Tuesday, January 31, 2012

Crocheted by Mom

This crocheted ring is so cute!  I love the little button.  I'll have to do a tutorial post on this since she made up the part of the pattern that attached the flower to the ring.
 I love the button my mom added to the center of this felted flower.  I also love the black edging.
 These are socks my mom made for me.  There are little pearl beads strung onto the yarn at intervals throughout the ankle part.  They are cozy and machine-washable.  

Monday, January 30, 2012

Projects: Future and Current

Today my mom and I went to Hobby Lobby and bought supplies for some future craft projects.  
This is going to be a fun one:
 Below is a large jar ready to be etched.  I used the etching cream on a small jar and it worked great!  DIY post to come...
 This is a project my mom is working on.  It is nearly finished.  Isn't it cute!
 Oh boy, this yarn is going to become a really cool bag.  I'll post photos when my mom is finished with it.
 I can't wait to see these fabrics together in an amazing quilt.

Sunday, January 29, 2012

Past Photos


Hope you are having a relaxing Sunday!

Saturday, January 28, 2012

Erin's Pumpkin Pancakes

These pumpkin pancakes were fluffy and delicious.  I ate them for a couple of days because the recipe made quite a bit of batter.  They are good with jam, with peanut butter and syrup, and of course, with butter and syrup.  
Pumpkin Pancakes:

2 Cups Flour

2 Tbsp brown sugar, packed-break it up before mixing it in flour

1 Tbsp baking powder

1 1/4tsp pumpkin pie spice

1 tsp salt

1/2 cup nuts, chopped (optional)-I don't use

1/2 cup pumpkin-fresh or canned

1 large egg

2 Tbsp vegetable oil

1 cup milk

Mix wet ingredients first then mix in dry ingredients. At this point the batter will be very thick, I use 
more milk to thin it to desired thickness. Then cook like normal pancake.

Thanks for the recipe, Erin!

Friday, January 27, 2012

Quilt Progress

You may remember this fabric stack from a previous post.  I finished the quilt top using every single one!  It is a wild grouping of fabrics, but I love the bright colors.  
When McGuirk hears me start sewing, he likes to come in the room and hang out with me.  It's too cute.
All 30 blocks are done!
The photo below shows the sun streaming in from the window.  The one below this is with the curtains closed.  It's hard to get the right lighting...

Thursday, January 26, 2012

Show and Tell: Pillows

I thought I'd share two pillows that I made in the past, and still love.  This first pillow I made for Daniel back when we were first dating.  He drew the design and mailed it to me as a gift.  The hands in the picture are signing "love life."  So it is the "love life, eat ice-cream" pillow.  The idea came to him from a discussion we had about eating ice-cream everyday and not worrying about gaining weight because life is short, etc.  Not necessarily the best philosophy, but entertaining.  He drew the sign language because he learned that I used to be a sign language interpreter.  Anyways, my dad printed the drawing onto fabric and I used that to make this pillow:
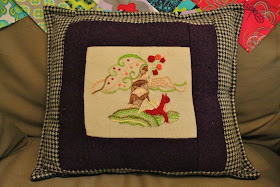
 The pillow below is one of my first embroidery projects.  The idea came from the book, Kyuuto! Japanese Crafts: Wooly Embroidery.  The book showed a deer under the tree, but I decided to make mine into a red dragon instead.  I think it actually looks more like a kitty dragon with those ears.  Oh well!  I used my mom's wool scraps to make boarders.  I like how it turned out.  

Wednesday, January 25, 2012

DIY: Concrete Mushroom

These sweet little mushrooms were designed by my dad.  He makes many pieces for garden decorations. 
 For our wedding backyard barbecue, my dad made around 100 mushrooms, which we used to decorate the garden, and had guests take one home with them.  We helped paint them along with our moms whose hands you can see on either edge of this photo below:
I'm looking forward to sharing this project!  What you will need: 

-concrete
-water
-plastic wrap
-small bowl filled with sand
-acrylic paint

Step 1: Add just enough water to the concrete to make the mixture stiff enough to stand up on it's own.  (The amount of concrete you use depends on how many mushrooms you are planning to make.)  Mold the mushroom stem on a piece of plastic wrap, as seen below.  
 Let the stem dry.  With our cool weather, I let it sit for a full day to dry completely.
Step 2:  Fill your bowl with damp sand and cover it with plastic wrap.
Step 3:  Using your hands, or a previously made mushroom, or any object that is mushroom-shaped, make an imprint in the sand on top of the plastic wrap.  This will be your mushroom mold.
Step 4:  Mix concrete that is softer than the concrete mixed for the stem.  Then fill the mushroom mold with this mixture.  As you can see below, I mixed too much water into the concrete and it is running over the edge of my mold.  It will be ok because I can file down or chip off unwanted concrete after the piece is dry.
Step 5:  Place the dry stem into the wet concrete as seen below.  If it seems like it won't stay in place, the trick is to simply hold it where you want it to be for 30 seconds or so.  You will see that it stays right there after that.  This also works if your mushroom-top concrete is rather thick and it seems like the stem won't go in.  Just hold it there with gentle pressure.  
Here is the mushroom after it has been given plenty of time to dry in the mold:
 Paint away!  If you like the shiny look, use a super glossy paint, or spray them with a varnish after you've painted them.  I like the vibrant colors of these mushrooms:  
Interested in winning a FREE mushroom?  Visit this post to enter the giveaway!  Good luck!

Tuesday, January 24, 2012

Stuffed Peppers

This is a healthy good meal that can be altered in so many ways.  Don't like mushrooms?  Don't add them!  Can't stand couscous?  Use rice!  
Here are the key ingredients that I used:

-half of an onion
-2 peppers
-half of a container of button mushrooms
-a couple of handfuls of spinach
-1/3 cup of couscous
also:
-garlic powder
-cumin
-coriander
-chili powder 
-salt

 Chop up the onion and mushrooms.  Add a little salt.  Saute until soft.  
 Cut off the tops of the peppers and clean out the insides:
 I chopped up the tops of the peppers and threw them in the pan with the onions and mushrooms:
 I added the spinach after that.  When it was cooked, I dumped it out onto a plate so I could use the pan to cook the couscous.  One pan meal!
 After the couscous is cooked according to the package directions, add the vegetables back into the pan.  
I added pinches or palmfuls of these, and salt.  Add to your taste.
 Stuff the peppers: 
 Cover with foil and bake them for 30 minutes at 375 degrees.  The peppers were just softened.  
 After that I added some cheese and melted it under the broiler.  They were delicious and very filling!